Drawing Leather Texture
. . . that looks SO soft and smooth
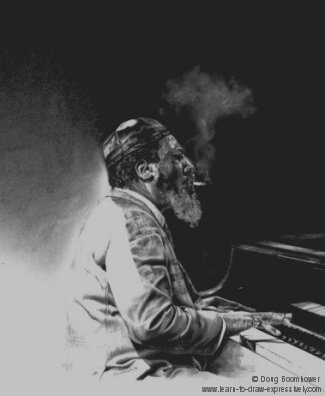
One of the challenges in this drawing was how to convincingly depict the leather texture in this musician's cap. (Always strive to present yourself with new artistic challenges.)
This jazz pianist, the legendary Thelonious Monk, was known for wearing a variety of different hats. In this case, he is wearing a leather skull cap.
When drawing textures, think tactile. In other words, ask yourself, "how would it feel to the touch?"
Leather texture is soft and pliable, so I use soft charcoal and soft brushes for the most part.
I use a little hard lead (HB) charcoal to give definition to the form of the hat, and to add contrast. The hard-edged contrast will emphasize the soft areas.
The overall shape of the skull cap is not completely round on top because it has to adhere to the natural shape of the musician's skull.
Notice it dips slightly at the back.
To get the overall leather effect, use a soft lead charcoal, (3B or softer). Carefully decide where the dark areas are going to be and then block them in lightly with a charcoal pencil.
Then with a soft brush, brush those areas repeatedly until they get that soft leather look. (Remember not to overdo your brushing or you could bruise the tooth of the paper which means you may lose the effect.)

Leather will have wrinkles in it. These are shown throughout (see arrow #1).
You will notice that each dark wrinkled area will be accompanied by a light area. A wrinkle just means you have areas that catch the light and adjacent areas that are hidden in the shadows and that makes it look realistic.
Most of the highlighted areas were done with a kneaded eraser.
For more in depth examples of the logic of folds and wrinkles, look at these shirts.
Arrow #2 shows where I used hard edged (HB) charcoal pencil for sharp lines. They indicate the seams in the hat. All of those areas are applied with a heavier pressure on the pencil. They also are accompanied by adjacent but subtly lighter areas. (Examine closely and you'll see what I mean.)
The most obvious eye-catching highlight is the top of the skullcap. It's a wonderful contrast to the rest of the hat. (Unfortunately, your monitor might not show the soft edges around that highlighted area.) Those soft edges reinforce the softness of leather as it "melts" into the highlight.
To keep this highlighted area completely clean from charcoal dust, cover it with removable tape. When the drawing is completed, remove the tape and soften the edges of the highlight.
A rule of thumb I always follow is to cover very important highlights with tape in order that those areas do not attract charcoal dust during my working process.
See more techniques on how to strengthen your drawings by creating eye-catching textures.
Return from Drawing Leather Texture to Home Page


